Documentation
List current running Containers
docker ps
You can also use the following command if you want to see only this project containers:
docker-compose ps
Close all running Containers
docker-compose stop
To stop single container do:
docker-compose stop {container-name}
Delete all existing Containers
docker-compose down
Enter a Container (run commands in a running Container)
1 - First list the current running containers with docker ps
2 - Enter any container using:
docker-compose exec {container-name} bash
Example: enter MySQL container
docker-compose exec mysql bash
Example: enter to MySQL prompt within MySQL container
docker-compose exec mysql mysql -u homestead -psecret
3 - To exit a container, type exit.
Edit default container configuration
Open the docker-compose.yml and change anything you want.
Examples:
Change MySQL Database Name:
    environment:
        MYSQL_DATABASE: laradock
    ...
Change Redis default port to 1111:
    ports:
        - "1111:6379"
    ...
Edit a Docker Image
1 - Find the Dockerfile of the image you want to edit,
example for mysql it will be mysql/Dockerfile.
2 - Edit the file the way you want.
3 - Re-build the container:
docker-compose build mysql
More info on Containers rebuilding here.
Build/Re-build Containers
If you do any change to any Dockerfile make sure you run this command, for the changes to take effect:
docker-compose build
Optionally you can specify which container to rebuild (instead of rebuilding all the containers):
docker-compose build {container-name}
You might use the --no-cache option if you want full rebuilding (docker-compose build --no-cache {container-name}).
Add more Software (Docker Images)
To add an image (software), just edit the docker-compose.yml and add your container details, to do so you need to be familiar with the docker compose file syntax.
View the Log files
The NGINX Log file is stored in the logs/nginx directory.
However to view the logs of all the other containers (MySQL, PHP-FPM,…) you can run this:
docker-compose logs {container-name}
docker-compose logs -f {container-name}
More options
Install PHP Extensions
Before installing PHP extensions, you have to decide first whether you need FPM or CLI, because each of them has it’s own different container, if you need it for both, you have to edit both containers.
The PHP-FPM extensions should be installed in php-fpm/Dockerfile-XX. (replace XX with your default PHP version number).
The PHP-CLI extensions should be installed in workspace/Dockerfile.
Change the (PHP-FPM) Version
By default the latest stable PHP versin is configured to run.
The PHP-FPM is responsible of serving your application code, you don’t have to change the PHP-CLI version if you are planning to run your application on different PHP-FPM version.
A) Switch from PHP 7.2 to PHP 5.6
1 - Open the .env.
2 - Search for PHP_VERSION.
3 - Set the desired version number:
PHP_VERSION=5.6
4 - Finally rebuild the image
docker-compose build php-fpm
For more details about the PHP base image, visit the official PHP docker images.
Change the PHP-CLI Version
By default PHP-CLI 7.0 is running.
Note: it’s not very essential to edit the PHP-CLI version. The PHP-CLI is only used for the Artisan Commands & Composer. It doesn’t serve your Application code, this is the PHP-FPM job.
The PHP-CLI is installed in the Workspace container. To change the PHP-CLI version you need to simply change the PHP_VERSION in te .env file as follow:
1 - Open the .env.
2 - Search for PHP_VERSION.
3 - Set the desired version number:
PHP_VERSION=7.2
4 - Finally rebuild the image
docker-compose build workspace
Install xDebug
1 - First install xDebug in the Workspace and the PHP-FPM Containers:
a) open the .env file
b) search for the WORKSPACE_INSTALL_XDEBUG argument under the Workspace Container
c) set it to true
d) search for the PHP_FPM_INSTALL_XDEBUG argument under the PHP-FPM Container
e) set it to true
2 - Re-build the containers docker-compose build workspace php-fpm
For information on how to configure xDebug with your IDE and work it out, check this Repository or follow up on the next section if you use linux and PhpStorm.
Install phpdbg
Install phpdbg in the Workspace and the PHP-FPM Containers:
1 - Open the .env.
2 - Search for WORKSPACE_INSTALL_PHPDBG.
3 - Set value to true
4 - Do the same for PHP_FPM_INSTALL_PHPDBG
WORKSPACE_INSTALL_PHPDBG=true
PHP_FPM_INSTALL_PHPDBG=true
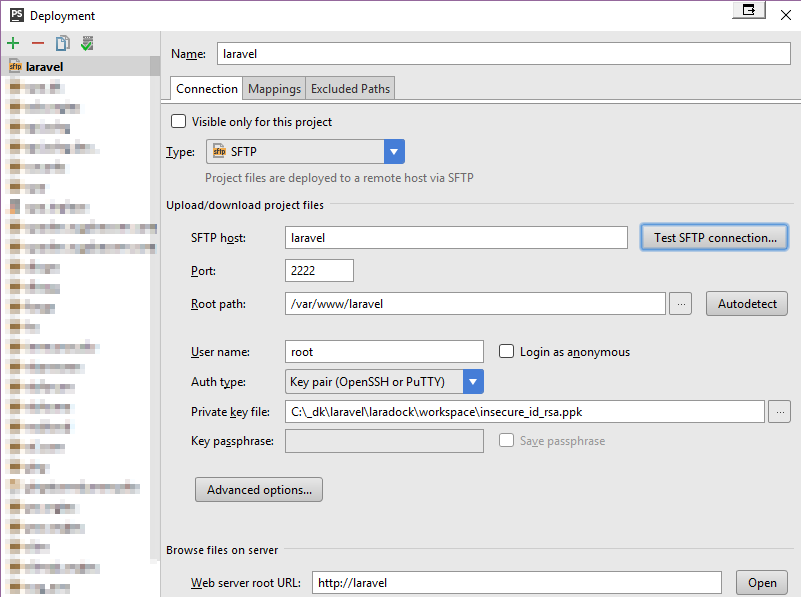
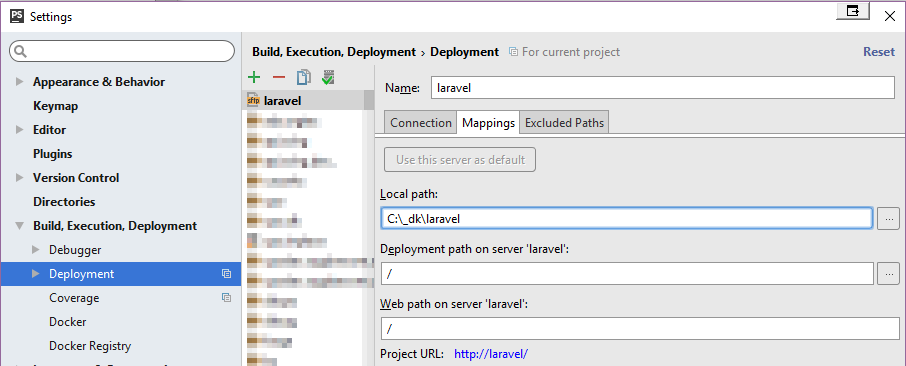
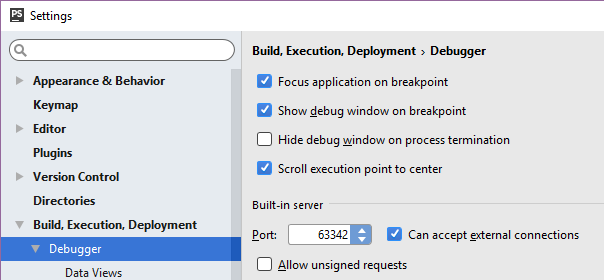
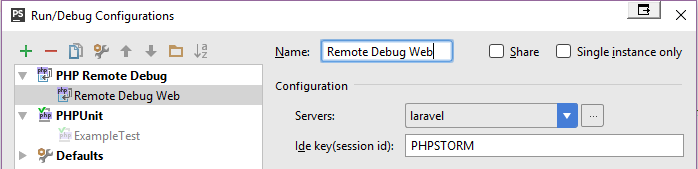
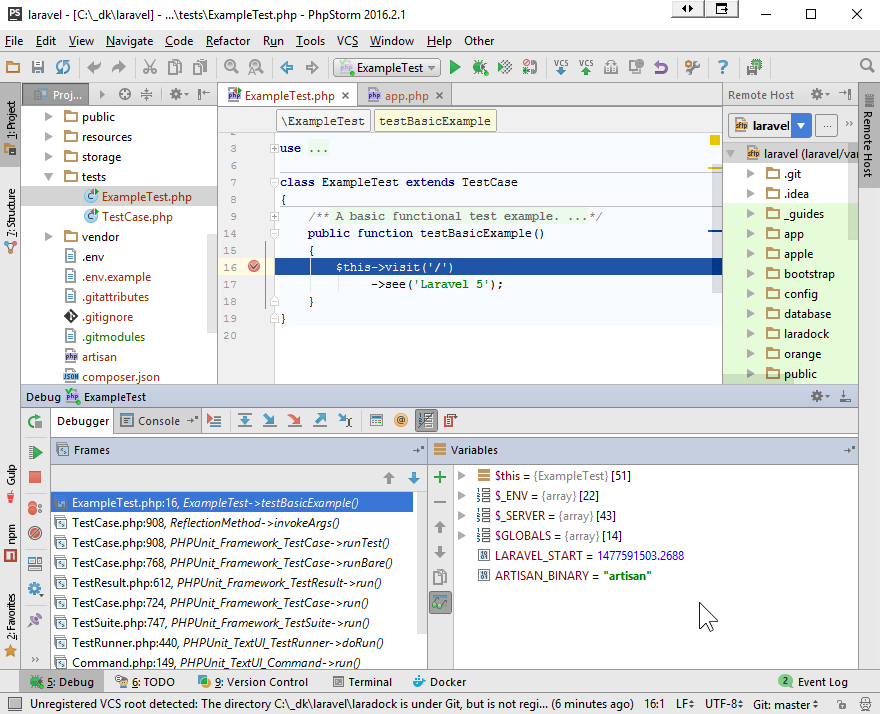
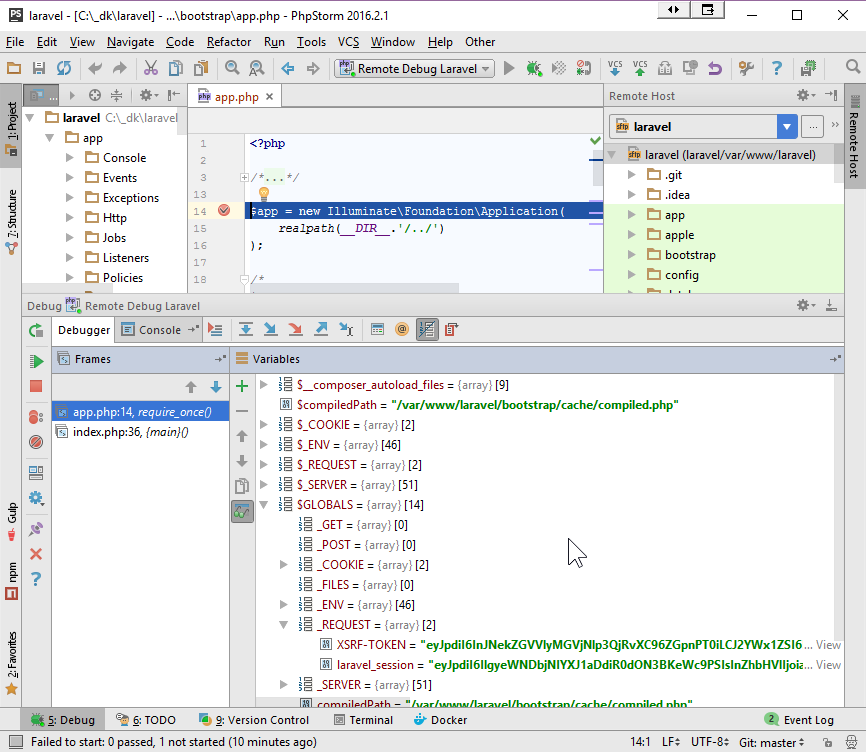
Setup remote debugging for PhpStorm on Linux
 .
.
- Create a server with name
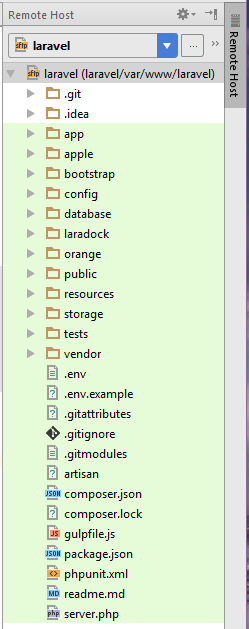
laradock (matches PHP_IDE_CONFIG key in environment file) and make sure to map project root path with server correctly.
 .
.
- Start listening for debug connections, place a breakpoint and you are good to go !
Start/Stop xDebug:
By installing xDebug, you are enabling it to run on startup by default.
To control the behavior of xDebug (in the php-fpm Container), you can run the following commands from the Laradock root folder, (at the same prompt where you run docker-compose):
- Stop xDebug from running by default:
.php-fpm/xdebug stop.
- Start xDebug by default:
.php-fpm/xdebug start.
- See the status:
.php-fpm/xdebug status.
Note: If .php-fpm/xdebug doesn’t execute and gives Permission Denied error the problem can be that file xdebug doesn’t have execution access. This can be fixed by running chmod command with desired access permissions.
Install ionCube Loader
1 - First install ionCube Loader in the Workspace and the PHP-FPM Containers:
a) open the .env file
b) search for the WORKSPACE_INSTALL_IONCUBE argument under the Workspace Container
c) set it to true
d) search for the PHP_FPM_INSTALL_IONCUBE argument under the PHP-FPM Container
e) set it to true
2 - Re-build the containers docker-compose build workspace php-fpm
Always download the latest version of Loaders for ionCube .
1 - Open the .env file
2 - Search for the WORKSPACE_INSTALL_DEPLOYER argument under the Workspace Container
3 - Set it to true
4 - Re-build the containers docker-compose build workspace
Deployer Documentation Here
Prepare Laradock for Production
It’s recommended for production to create a custom docker-compose.yml file. For that reason, Laradock is shipped with production-docker-compose.yml which should contain only the containers you are planning to run on production (usage example: docker-compose -f production-docker-compose.yml up -d nginx mysql redis ...).
Note: The Database (MySQL/MariaDB/…) ports should not be forwarded on production, because Docker will automatically publish the port on the host, which is quite insecure, unless specifically told not to. So make sure to remove these lines:
ports:
    - "3306:3306"
To learn more about how Docker publishes ports, please read this excellent post on the subject.
Setup Laravel and Docker on Digital Ocean
Install Laravel from a Docker Container
1 - First you need to enter the Workspace Container.
2 - Install Laravel.
Example using Composer
composer create-project laravel/laravel my-cool-app "5.2.*"
We recommend using composer create-project instead of the Laravel installer, to install Laravel.
For more about the Laravel installation click here.
3 - Edit .env to Map the new application path:
By default, Laradock assumes the Laravel application is living in the parent directory of the laradock folder.
Since the new Laravel application is in the my-cool-app folder, we need to replace ../:/var/www with ../my-cool-app/:/var/www, as follow:
APP_CODE_PATH_HOST=../my-cool-app/
4 - Go to that folder and start working..
cd my-cool-app
5 - Go back to the Laradock installation steps to see how to edit the .env file.
Run Artisan Commands
You can run artisan commands and many other Terminal commands from the Workspace container.
1 - Make sure you have the workspace container running.
docker-compose up -d workspace // ..and all your other containers
2 - Find the Workspace container name:
docker-compose ps
3 - Enter the Workspace container:
docker-compose exec workspace bash
Note: Should add --user=laradock (example docker-compose exec --user=laradock workspace bash) to have files created as your host’s user to prevent issue owner of log file will be changed to root then laravel website cannot write on log file if using rotated log and new log file not existed
4 - Run anything you want :)
php artisan
Composer update
phpunit
Run Laravel Queue Worker
1 - Create supervisor configuration file (for ex., named laravel-worker.conf) for Laravel Queue Worker in php-worker/supervisord.d/ by simply copy from laravel-worker.conf.example
2 - Start everything up
docker-compose up -d php-worker
Run Laravel Scheduler
Laradock provides 2 ways to run Laravel Scheduler
1 - Using cron in workspace container. Most of the time, when you start Laradock, it’ll automatically start workspace container with cron inside, along with setting to run schedule:run command every minute.
2 - Using Supervisord in php-worker to run schedule:run. This way is suggested when you don’t want to start workspace in production environment.
a) Comment out cron setting in workspace container, file workspace/crontab/laradock
# * * * * * laradock /usr/bin/php /var/www/artisan schedule:run >> /dev/null 2>&1
b) Create supervisor configuration file (for ex., named laravel-scheduler.conf) for Laravel Scheduler in php-worker/supervisord.d/ by simply copy from laravel-scheduler.conf.example
c) Start php-worker container
docker-compose up -d php-worker
Use Mailu
1 - You need register a domain.
2 - Required RECAPTCHA for signup email HERE
2 - modify following environment variable in .env file
MAILU_RECAPTCHA_PUBLIC_KEY=<YOUR_RECAPTCHA_PUBLIC_KEY>
MAILU_RECAPTCHA_PRIVATE_KEY=<YOUR_RECAPTCHA_PRIVATE_KEY>
MAILU_DOMAIN=laradock.io
MAILU_HOSTNAMES=mail.laradock.io
2 - Open your browser and visit http://YOUR_DOMAIN.
Use NetData
1 - Run the NetData Container (netdata) with the docker-compose up command. Example:
docker-compose up -d netdata
2 - Open your browser and visit the localhost on port 19999: http://localhost:19999
1 - Run the Metabase Container (metbase) with the docker-compose up command. Example:
docker-compose up -d metabase
2 - Open your browser and visit the localhost on port 3030: http://localhost:3030
3 - You can use environment to configure Metabase container. See docs in: Running Metabase on Docker
Use Jenkins
1) Boot the container docker-compose up -d jenkins. To enter the container type docker-compose exec jenkins bash.
2) Go to http://localhost:8090/ (if you didn’t chanhed your default port mapping)
3) Authenticate from the web app.
- Default username is
admin.
- Default password is
docker-compose exec jenkins cat /var/jenkins_home/secrets/initialAdminPassword.
(To enter container as root type docker-compose exec --user root jenkins bash).
4) Install some plugins.
5) Create your first Admin user, or continue as Admin.
Note: to add user go to http://localhost:8090/securityRealm/addUser and to restart it from the web app visit http://localhost:8090/restart.
You may wanna change the default security configuration, so go to http://localhost:8090/configureSecurity/ under Authorization and choosing “Anyone can do anything” or “Project-based Matrix Authorization Strategy” or anything else.
Use Redis
1 - First make sure you run the Redis Container (redis) with the docker-compose up command.
docker-compose up -d redis
To execute redis commands, enter the redis container first docker-compose exec redis bash then enter the redis-cli.
2 - Open your Laravel’s .env file and set the REDIS_HOST to redis
REDIS_HOST=redis
If you’re using Laravel, and you don’t find the REDIS_HOST variable in your .env file. Go to the database configuration file config/database.php and replace the default 127.0.0.1 IP with redis for Redis like this:
'redis' => [
    'cluster' => false,
    'default' => [
        'host'     => 'redis',
        'port'     => 6379,
        'database' => 0,
    ],
],
3 - To enable Redis Caching and/or for Sessions Management. Also from the .env file set CACHE_DRIVER and SESSION_DRIVER to redis instead of the default file.
CACHE_DRIVER=redis
SESSION_DRIVER=redis
4 - Finally make sure you have the predis/predis package (~1.0) installed via Composer:
composer require predis/predis:^1.0
5 - You can manually test it from Laravel with this code:
\Cache::store('redis')->put('Laradock', 'Awesome', 10);
Use Redis Cluster
1 - First make sure you run the Redis-Cluster Container (redis-cluster) with the docker-compose up command.
docker-compose up -d redis-cluster
2 - Open your Laravel’s config/database.php and set the redis cluster configuration. Below is example configuration with phpredis.
Read the Laravel official documentation for more details.
'redis' => [
    'client' => 'phpredis',
    'options' => [
        'cluster' => 'redis',
    ],
    'clusters' => [
        'default' => [
            [
                'host' => 'redis-cluster',
                'password' => null,
                'port' => 7000,
                'database' => 0,
            ],
        ],
    ],
],
Use Mongo
1 - First install mongo in the Workspace and the PHP-FPM Containers:
a) open the .env file
b) search for the WORKSPACE_INSTALL_MONGO argument under the Workspace Container
c) set it to true
d) search for the PHP_FPM_INSTALL_MONGO argument under the PHP-FPM Container
e) set it to true
2 - Re-build the containers docker-compose build workspace php-fpm
3 - Run the MongoDB Container (mongo) with the docker-compose up command.
docker-compose up -d mongo
4 - Add the MongoDB configurations to the config/database.php configuration file:
'connections' => [

    'mongodb' => [
        'driver'   => 'mongodb',
        'host'     => env('DB_HOST', 'localhost'),
        'port'     => env('DB_PORT', 27017),
        'database' => env('DB_DATABASE', 'database'),
        'username' => '',
        'password' => '',
        'options'  => [
            'database' => '',
        ]
    ],

	// ...

],
5 - Open your Laravel’s .env file and update the following variables:
- set the
DB_HOST to your mongo.
- set the
DB_PORT to 27017.
- set the
DB_DATABASE to database.
6 - Finally make sure you have the jenssegers/mongodb package installed via Composer and its Service Provider is added.
composer require jenssegers/mongodb
More details about this here.
7 - Test it:
- First let your Models extend from the Mongo Eloquent Model. Check the documentation.
- Enter the Workspace Container.
- Migrate the Database
php artisan migrate.
Use PhpMyAdmin
1 - Run the phpMyAdmin Container (phpmyadmin) with the docker-compose up command. Example:
# use with mysql
docker-compose up -d mysql phpmyadmin

# use with mariadb
docker-compose up -d mariadb phpmyadmin
Note: To use with MariaDB, open .env and set PMA_DB_ENGINE=mysql to PMA_DB_ENGINE=mariadb.
2 - Open your browser and visit the localhost on port 8080: http://localhost:8080
Use Gitlab
1 - Run the Gitlab Container (gitlab) with the docker-compose up command. Example:
docker-compose up -d gitlab
2 - Open your browser and visit the localhost on port 8989: http://localhost:8989
Note: You may change GITLAB_DOMAIN_NAME to your own domain name like http://gitlab.example.com default is http://localhost
Use Adminer
1 - Run the Adminer Container (adminer) with the docker-compose up command. Example:
docker-compose up -d adminer
2 - Open your browser and visit the localhost on port 8080: http://localhost:8080
Note: We’ve locked Adminer to version 4.3.0 as at the time of writing it contained a major bug preventing PostgreSQL users from logging in. If that bug is fixed (or if you’re not using PostgreSQL) feel free to set Adminer to the latest version within the Dockerfile: FROM adminer:latest
Use Portainer
1 - Run the Portainer Container (portainer) with the docker-compose up command. Example:
docker-compose up -d portainer
2 - Open your browser and visit the localhost on port 9010: http://localhost:9010
Use PgAdmin
1 - Run the pgAdmin Container (pgadmin) with the docker-compose up command. Example:
docker-compose up -d postgres pgadmin
2 - Open your browser and visit the localhost on port 5050: http://localhost:5050
3 - At login page use default credentials:
Username : pgadmin4@pgadmin.org
Password : admin
Use Beanstalkd
1 - Run the Beanstalkd Container:
docker-compose up -d beanstalkd
2 - Configure Laravel to connect to that container by editing the config/queue.php config file.
a. first set beanstalkd as default queue driver
b. set the queue host to beanstalkd : QUEUE_HOST=beanstalkd
beanstalkd is now available on default port 11300.
3 - Require the dependency package pda/pheanstalk using composer.
Optionally you can use the Beanstalkd Console Container to manage your Queues from a web interface.
1 - Run the Beanstalkd Console Container:
docker-compose up -d beanstalkd-console
2 - Open your browser and visit http://localhost:2080/
Note: You can customize the port on which beanstalkd console is listening by changing BEANSTALKD_CONSOLE_HOST_PORT in .env. The default value is 2080.
3 - Add the server
- Host: beanstalkd
- Port: 11300
4 - Done.
Use ElasticSearch
1 - Run the ElasticSearch Container (elasticsearch) with the docker-compose up command:
docker-compose up -d elasticsearch
2 - Open your browser and visit the localhost on port 9200: http://localhost:9200
The default username is elastic and the default password is changeme.
Install ElasticSearch Plugin
1 - Install an ElasticSearch plugin.
docker-compose exec elasticsearch /usr/share/elasticsearch/bin/plugin install {plugin-name}
2 - Restart elasticsearch container
docker-compose restart elasticsearch
Use Selenium
1 - Run the Selenium Container (selenium) with the docker-compose up command. Example:
docker-compose up -d selenium
2 - Open your browser and visit the localhost on port 4444 at the following URL: http://localhost:4444/wd/hub
Use RethinkDB
The RethinkDB is an open-source Database for Real-time Web (RethinkDB).
A package (Laravel RethinkDB) is being developed and was released a version for Laravel 5.2 (experimental).
1 - Run the RethinkDB Container (rethinkdb) with the docker-compose up command.
docker-compose up -d rethinkdb
2 - Access the RethinkDB Administration Console http://localhost:8090/#tables for create a database called database.
3 - Add the RethinkDB configurations to the config/database.php configuration file:
'connections' => [

	'rethinkdb' => [
		'name'      => 'rethinkdb',
		'driver'    => 'rethinkdb',
		'host'      => env('DB_HOST', 'rethinkdb'),
		'port'      => env('DB_PORT', 28015),
		'database'  => env('DB_DATABASE', 'test'),
	]

	// ...

],
4 - Open your Laravel’s .env file and update the following variables:
- set the
DB_CONNECTION to your rethinkdb.
- set the
DB_HOST to rethinkdb.
- set the
DB_PORT to 28015.
- set the
DB_DATABASE to database.
Additional Notes
Use Minio
1 - Configure Minio:
- On the workspace container, change INSTALL_MC to true to get the client
- Set MINIO_ACCESS_KEY and MINIO_ACCESS_SECRET if you wish to set proper keys
2 - Run the Minio Container (minio) with the docker-compose up command. Example:
docker-compose up -d minio
3 - Open your browser and visit the localhost on port 9000 at the following URL: http://localhost:9000
4 - Create a bucket either through the webui or using the mc client:
mc mb minio/bucket
5 - When configuring your other clients use the following details:
  S3_HOST=http://minio
  S3_KEY=access
  S3_SECRET=secretkey
  S3_REGION=us-east-1
  S3_BUCKET=bucket
Use Thumbor
Thumbor is a smart imaging service. It enables on-demand crop, resizing and flipping of images. (Thumbor)
1 - Configure Thumbor:
- Checkout all the options under the thumbor settings
2 - Run the Thumbor Container (minio) with the docker-compose up command. Example:
docker-compose up -d thumbor
3 - Navigate to an example image on http://localhost:8000/unsafe/300x300/i.imgur.com/bvjzPct.jpg
For more documentation on Thumbor visit the Thumbor documenation page
Use AWS
1 - Configure AWS:
- make sure to add your SSH keys in aws/ssh_keys folder
2 - Run the Aws Container (aws) with the docker-compose up command. Example:
docker-compose up -d aws
3 - Access the aws container with docker-compose exec aws bash
4 - To start using eb cli inside the container, initialize your project first by doing ‘eb init’. Read the aws eb cli docs for more details.
Use Grafana
1 - Configure Grafana: Change Port using GRAFANA_PORT if you wish to. Default is port 3000.
2 - Run the Grafana Container (grafana) with the docker-compose upcommand:
docker-compose up -d grafana
3 - Open your browser and visit the localhost on port 3000 at the following URL: http://localhost:3000
4 - Login using the credentials User = admin, Password = admin. Change the password in the web interface if you want to.
Use Traefik
To use Traefik you need to do some changes in traefik/trafik.toml and docker-compose.yml.
1 - Open traefik.toml and change the e-mail property in acme section.
2 - Change your domain in acme.domains. For example: main = "example.org"
2.1 - If you have subdomains, you must add them to sans property in acme.domains section.
[[acme.domais]]
  main = "example.org"
  sans = ["monitor.example.org", "pma.example.org"]
3 - If you need to add basic authentication (https://docs.traefik.io/configuration/entrypoints/#basic-authentication), you just need to add the following text after [entryPoints.https.tls]:
[entryPoints.https.auth.basic]
  users = ["user:password"]
4 - You need to change the docker-compose.yml file to match the Traefik needs. If you want to use Traefik, you must not expose the ports of each container to the internet, but specify some labels.
4.1 For example, let’s try with NGINX. You must have:
nginx:
  build:
    context: ./nginx
    args:
      - PHP_UPSTREAM_CONTAINER=${NGINX_PHP_UPSTREAM_CONTAINER}
      - PHP_UPSTREAM_PORT=${NGINX_PHP_UPSTREAM_PORT}
      - CHANGE_SOURCE=${CHANGE_SOURCE}
  volumes:
    - ${APP_CODE_PATH_HOST}:${APP_CODE_PATH_CONTAINER}
    - ${NGINX_HOST_LOG_PATH}:/var/log/nginx
    - ${NGINX_SITES_PATH}:/etc/nginx/sites-available
  depends_on:
    - php-fpm
  networks:
    - frontend
    - backend
  labels:
    - traefik.backend=nginx
    - traefik.frontend.rule=Host:example.org
    - traefik.port=80
instead of
nginx:
  build:
    context: ./nginx
    args:
      - PHP_UPSTREAM_CONTAINER=${NGINX_PHP_UPSTREAM_CONTAINER}
      - PHP_UPSTREAM_PORT=${NGINX_PHP_UPSTREAM_PORT}
      - CHANGE_SOURCE=${CHANGE_SOURCE}
  volumes:
    - ${APP_CODE_PATH_HOST}:${APP_CODE_PATH_CONTAINER}
    - ${NGINX_HOST_LOG_PATH}:/var/log/nginx
    - ${NGINX_SITES_PATH}:/etc/nginx/sites-available
    - ${NGINX_SSL_PATH}:/etc/nginx/ssl
  ports:
    - "${NGINX_HOST_HTTP_PORT}:80"
    - "${NGINX_HOST_HTTPS_PORT}:443"
  depends_on:
    - php-fpm
  networks:
    - frontend
    - backend
Use Mosquitto (MQTT Broker)
1 - Configure Mosquitto: Change Port using MOSQUITTO_PORT if you wish to. Default is port 9001.
2 - Run the Mosquitto Container (mosquitto) with the docker-compose upcommand:
docker-compose up -d mosquitto
3 - Open your command line and use a MQTT Client (Eg. https://github.com/mqttjs/MQTT.js) to subscribe a topic and publish a message.
4 - Subscribe: mqtt sub -t 'test' -h localhost -p 9001 -C 'ws' -v
5 - Publish: mqtt pub -t 'test' -h localhost -p 9001 -C 'ws' -m 'Hello!'
Install CodeIgniter
To install CodeIgniter 3 on Laradock all you have to do is the following simple steps:
1 - Open the docker-compose.yml file.
2 - Change CODEIGNITER=false to CODEIGNITER=true.
3 - Re-build your PHP-FPM Container docker-compose build php-fpm.
Install Powerline
1 - Open the .env file and set WORKSPACE_INSTALL_POWERLINE and WORKSPACE_INSTALL_PYTHON to true.
2 - Run docker-compose build workspace, after the step above.
Powerline is required python
Install Symfony
1 - Open the .env file and set WORKSPACE_INSTALL_SYMFONY to true.
2 - Run docker-compose build workspace, after the step above.
3 - The NGINX sites include a default config file for your Symfony project symfony.conf.example, so edit it and make sure the root is pointing to your project web directory.
4 - Run docker-compose restart if the container was already running, before the step above.
5 - Visit symfony.test
Miscellaneous
Change the timezone
To change the timezone for the workspace container, modify the TZ build argument in the Docker Compose file to one in the TZ database.
For example, if I want the timezone to be New York:
    workspace:
        build:
            context: ./workspace
            args:
                - TZ=America/New_York
    ...
We also recommend setting the timezone in Laravel.
Add locales to PHP-FPM
To add locales to the container:
1 - Open the .env file and set PHP_FPM_INSTALL_ADDITIONAL_LOCALES to true.
2 - Add locale codes to PHP_FPM_ADDITIONAL_LOCALES.
3 - Re-build your PHP-FPM Container docker-compose build php-fpm.
4 - Check enabled locales with docker-compose exec php-fpm locale -a
Adding cron jobs
You can add your cron jobs to workspace/crontab/root after the php artisan line.
* * * * * laradock /usr/bin/php /var/www/artisan schedule:run >> /dev/null 2>&1

# Custom cron
* * * * * root echo "Every Minute" > /var/log/cron.log 2>&1
Make sure you change the timezone if you don’t want to use the default (UTC).
If you are on Windows, verify that the line endings for this file are LF only, otherwise the cron jobs will silently fail.
Access workspace via ssh
You can access the workspace container through localhost:2222 by setting the INSTALL_WORKSPACE_SSH build argument to true.
To change the default forwarded port for ssh:
    workspace:
		ports:
			- "2222:22" # Edit this line
    ...
Then login using:
ssh -o PasswordAuthentication=no    \
    -o StrictHostKeyChecking=no     \
    -o UserKnownHostsFile=/dev/null \
    -p 2222                         \
    -i workspace/insecure_id_rsa    \
    laradock@localhost
To login as root, replace laradock@localhost with root@localhost.
Change the (MySQL) Version
By default MySQL 8.0 is running.
MySQL 8.0 is a development release. You may prefer to use the latest stable version, or an even older release. If you wish, you can change the MySQL image that is used.
Open up your .env file and set the MYSQL_VERSION variable to the version you would like to install.
MYSQL_VERSION=5.7
Available versions are: 5.5, 5.6, 5.7, 8.0, or latest. See https://store.docker.com/images/mysql for more information.
MySQL access from host
You can forward the MySQL/MariaDB port to your host by making sure these lines are added to the mysql or mariadb section of the docker-compose.yml or in your environment specific Compose file.
ports:
    - "3306:3306"
MySQL root access
The default username and password for the root MySQL user are root and root.
1 - Enter the MySQL container: docker-compose exec mysql bash.
2 - Enter mysql: mysql -uroot -proot for non root access use mysql -uhomestead -psecret.
3 - See all users: SELECT User FROM mysql.user;
4 - Run any commands show databases, show tables, select * from......
Create Multiple Databases (MySQL)
Create createdb.sql from mysql/docker-entrypoint-initdb.d/createdb.sql.example in mysql/docker-entrypoint-initdb.d/* and add your SQL syntax as follow:
CREATE DATABASE IF NOT EXISTS `your_db_1` COLLATE 'utf8_general_ci' ;
GRANT ALL ON `your_db_1`.* TO 'mysql_user'@'%' ;
Change MySQL port
Modify the mysql/my.cnf file to set your port number, 1234 is used as an example.
[mysqld]
port=1234
If you need MySQL access from your host, do not forget to change the internal port number ("3306:3306" -> "3306:1234") in the docker-compose configuration file.
Use custom Domain (instead of the Docker IP)
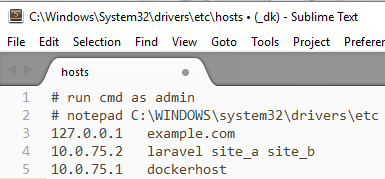
Assuming your custom domain is laravel.test
1 - Open your /etc/hosts file and map your localhost address 127.0.0.1 to the laravel.test domain, by adding the following:
127.0.0.1 laravel.test
2 - Open your browser and visit {http://laravel.test}
Optionally you can define the server name in the NGINX configuration file, like this:
server_name laravel.test;
Enable Global Composer Build Install
Enabling Global Composer Install during the build for the container allows you to get your composer requirements installed and available in the container after the build is done.
1 - Open the .env file
2 - Search for the WORKSPACE_COMPOSER_GLOBAL_INSTALL argument under the Workspace Container and set it to true
3 - Now add your dependencies to workspace/composer.json
4 - Re-build the Workspace Container docker-compose build workspace
Magento 2 authentication credential (composer install)
1 - Open the .env file
2 - Search for the WORKSPACE_COMPOSER_AUTH argument under the Workspace Container and set it to true
3 - Now add your credentials to workspace/auth.json
4 - Re-build the Workspace Container docker-compose build workspace
Install Prestissimo
Prestissimo is a plugin for composer which enables parallel install functionality.
1 - Enable Running Global Composer Install during the Build:
Click on this Enable Global Composer Build Install and do steps 1 and 2 only then continue here.
2 - Add prestissimo as requirement in Composer:
a - Now open the workspace/composer.json file
b - Add "hirak/prestissimo": "^0.3" as requirement
c - Re-build the Workspace Container docker-compose build workspace
Install Node + NVM
To install NVM and NodeJS in the Workspace container
1 - Open the .env file
2 - Search for the WORKSPACE_INSTALL_NODE argument under the Workspace Container and set it to true
3 - Re-build the container docker-compose build workspace
Install Node + YARN
Yarn is a new package manager for JavaScript. It is so faster than npm, which you can find here.To install NodeJS and Yarn in the Workspace container:
1 - Open the .env file
2 - Search for the WORKSPACE_INSTALL_NODE and WORKSPACE_INSTALL_YARN argument under the Workspace Container and set it to true
3 - Re-build the container docker-compose build workspace
To install NPM GULP toolkit in the Workspace container
1 - Open the .env file
2 - Search for the WORKSPACE_INSTALL_NPM_GULP argument under the Workspace Container and set it to true
3 - Re-build the container docker-compose build workspace
Install NPM BOWER package manager
To install NPM BOWER package manager in the Workspace container
1 - Open the .env file
2 - Search for the WORKSPACE_INSTALL_NPM_BOWER argument under the Workspace Container and set it to true
3 - Re-build the container docker-compose build workspace
Install NPM VUE CLI
To install NPM VUE CLI in the Workspace container
1 - Open the .env file
2 - Search for the WORKSPACE_INSTALL_NPM_VUE_CLI argument under the Workspace Container and set it to true
3 - Re-build the container docker-compose build workspace
Install NPM ANGULAR CLI
To install NPM ANGULAR CLI in the Workspace container
1 - Open the .env file
2 - Search for the WORKSPACE_INSTALL_NPM_ANGULAR_CLI argument under the Workspace Container and set it to true
3 - Re-build the container docker-compose build workspace
Install Linuxbrew
Linuxbrew is a package manager for Linux. It is the Linux version of MacOS Homebrew and can be found here. To install Linuxbrew in the Workspace container:
1 - Open the .env file
2 - Search for the WORKSPACE_INSTALL_LINUXBREW argument under the Workspace Container and set it to true
3 - Re-build the container docker-compose build workspace
Common Terminal Aliases
When you start your docker container, Laradock will copy the aliases.sh file located in the laradock/workspace directory and add sourcing to the container ~/.bashrc file.
You are free to modify the aliases.sh as you see fit, adding your own aliases (or function macros) to suit your requirements.
Install Aerospike extension
1 - First install aerospike in the Workspace and the PHP-FPM Containers:
a) open the .env file
b) search for the WORKSPACE_INSTALL_AEROSPIKE argument under the Workspace Container
c) set it to true
d) search for the PHP_FPM_INSTALL_AEROSPIKE argument under the PHP-FPM Container
e) set it to true
2 - Re-build the containers docker-compose build workspace php-fpm
Install Laravel Envoy (Envoy Task Runner)
1 - Open the .env file
2 - Search for the WORKSPACE_INSTALL_LARAVEL_ENVOY argument under the Workspace Container
3 - Set it to true
4 - Re-build the containers docker-compose build workspace
Laravel Envoy Documentation Here
Install php calendar extension
1 - Open the .env file
2 - Search for the PHP_FPM_INSTALL_CALENDAR argument under the PHP-FPM container
3 - Set it to true
4 - Re-build the containers docker-compose build php-fpm
Install libfaketime in the php-fpm container
Libfaketime allows you to control the date and time that is returned from the operating system.
It can be used by specifying a special string in the PHP_FPM_FAKETIME variable in the .env file.
For example:
PHP_FPM_FAKETIME=-1d
will set the clock back 1 day. See (https://github.com/wolfcw/libfaketime) for more information.
1 - Open the .env file
2 - Search for the PHP_FPM_INSTALL_FAKETIME argument under the PHP-FPM container
3 - Set it to true
4 - Search for the PHP_FPM_FAKETIME argument under the PHP-FPM container
5 - Set it to the desired string
6 - Re-build the containers docker-compose build php-fpm
Install YAML PHP extension in the php-fpm container
YAML PHP extension allows you to easily parse and create YAML structured data. I like YAML because it’s well readable for humans. See http://php.net/manual/en/ref.yaml.php and http://yaml.org/ for more info.
1 - Open the .env file
2 - Search for the PHP_FPM_INSTALL_YAML argument under the PHP-FPM container
3 - Set it to true
4 - Re-build the container docker-compose build php-fpm
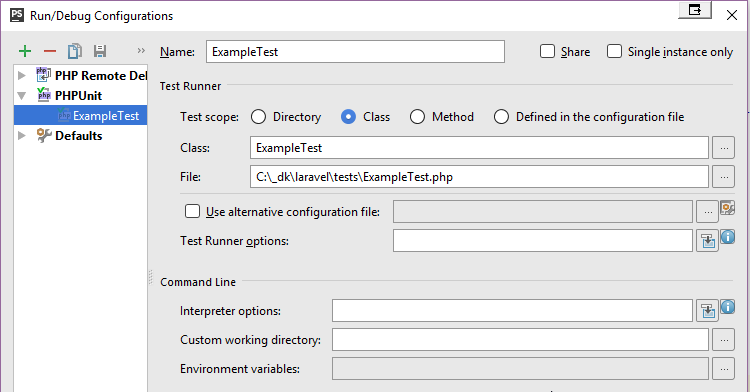
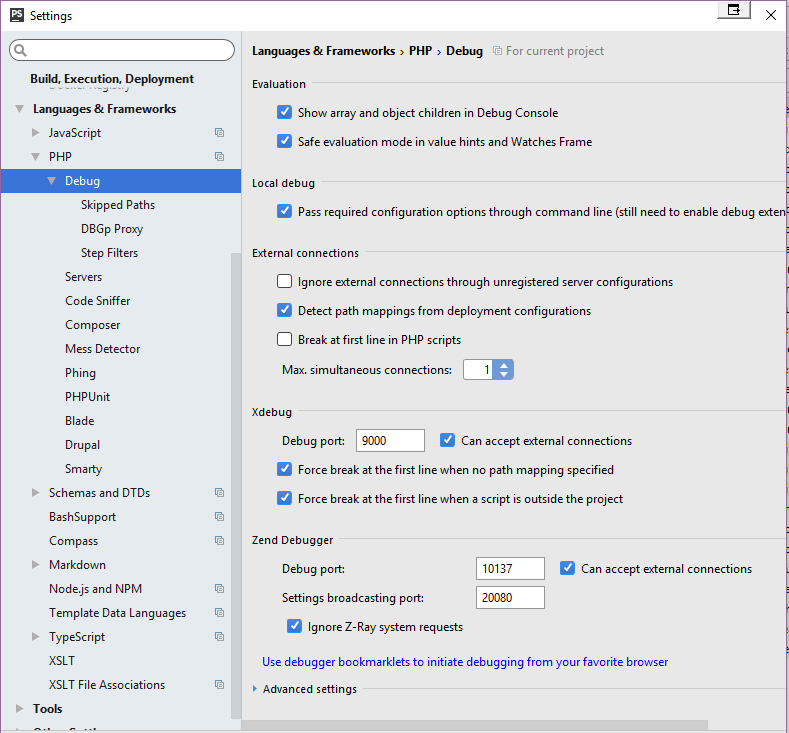
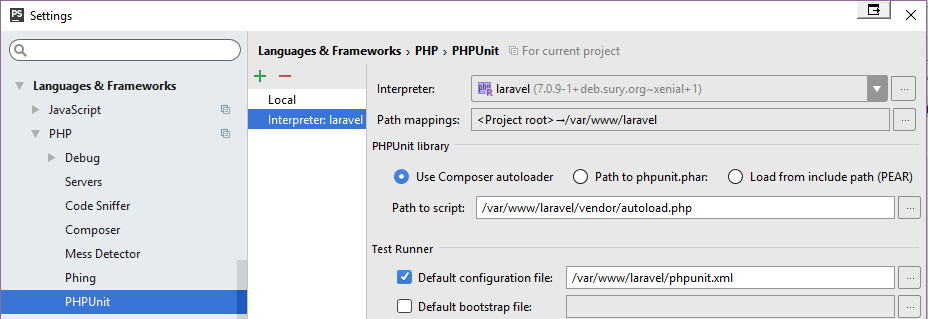
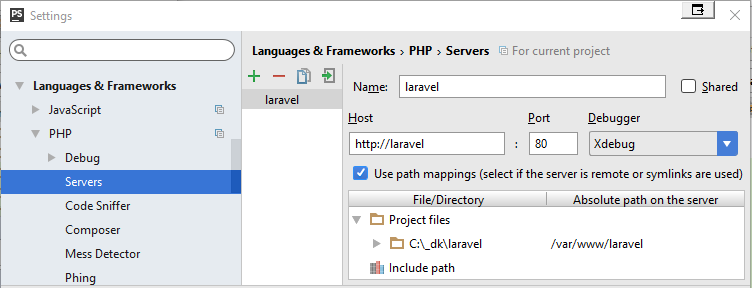
PHPStorm Debugging Guide
Remote debug Laravel web and phpunit tests.
Debugging Guide Here
Keep track of your Laradock changes
- Fork the Laradock repository.
- Use that fork as a submodule.
- Commit all your changes to your fork.
- Pull new stuff from the main repository from time to time.
Upgrading Laradock
Moving from Docker Toolbox (VirtualBox) to Docker Native (for Mac/Windows). Requires upgrading Laradock from v3.* to v4.*:
- Stop the docker VM
docker-machine stop {default}
- Install Docker for Mac or Windows.
- Upgrade Laradock to
v4.*.* (git pull origin master)
- Use Laradock as you used to do:
docker-compose up -d nginx mysql.
Note: If you face any problem with the last step above: rebuild all your containers
docker-compose build --no-cache
“Warning Containers Data might be lost!”
Improve speed on MacOS
Docker on the Mac is slow, at the time of writing. Especially for larger projects, this can be a problem. The problem is older than March 2016 - as it’s a such a long-running issue, we’re including it in the docs here.
So since sharing code into Docker containers with osxfs have very poor performance compared to Linux. Likely there are some workarounds:
Workaround A: using dinghy
Dinghy creates its own VM using docker-machine, it will not modify your existing docker-machine VMs.
Quick Setup giude, (we recommend you check their docs)
1) brew tap codekitchen/dinghy
2) brew install dinghy
3) dinghy create --provider virtualbox (must have virtualbox installed, but they support other providers if you prefer)
4) after the above command is done it will display some env variables, copy them to the bash profile or zsh or.. (this will instruct docker to use the server running inside the VM)
5) docker-compose up ...
Workaround B: using d4m-nfs
You can use the d4m-nfs solution in 2 ways, the first is by using the built-in Laradock integration, and the second is using the tool separately. Below is show case of both methods:
B.1: using the built in d4m-nfs integration
In simple terms, docker-sync creates a docker container with a copy of all the application files that can be accessed very quickly from the other containers.
On the other hand, docker-sync runs a process on the host machine that continuously tracks and updates files changes from the host to this intermediate container.
Out of the box, it comes pre-configured for OS X, but using it on Windows is very easy to set-up by modifying the DOCKER_SYNC_STRATEGY on the .env
Usage
Laradock comes with sync.sh, an optional bash script, that automates installing, running and stopping docker-sync. Note that to run the bash script you may need to change the permissions chmod 755 sync.sh
1) Configure your Laradock environment as you would normally do and test your application to make sure that your sites are running correctly.
2) Make sure to set DOCKER_SYNC_STRATEGY on the .env. Read the syncing strategies for details.
# osx: 'native_osx' (default)
# windows: 'unison'
# linux: docker-sync not required

DOCKER_SYNC_STRATEGY=native_osx
3) set APP_CODE_CONTAINER_FLAG to APP_CODE_CONTAINER_FLAG=:nocopy in the .env file
4) Install the docker-sync gem on the host-machine:
./sync.sh install
5) Start docker-sync and the Laradock environment.
Specify the services you want to run, as you would normally do with docker-compose up
./sync.sh up nginx mysql
Please note that the first time docker-sync runs, it will copy all the files to the intermediate container and that may take a very long time (15min+).
6) To stop the environment and docker-sync do:
./sync.sh down
Setting up Aliases (optional)
You may create bash profile aliases to avoid having to remember and type these commands for everyday development.
Add the following lines to your ~/.bash_profile:
alias devup="cd /PATH_TO_LARADOCK/laradock; ./sync.sh up nginx mysql" #add your services
alias devbash="cd /PATH_TO_LARADOCK/laradock; ./sync.sh bash"
alias devdown="cd /PATH_TO_LARADOCK/laradock; ./sync.sh down"
Now from any location on your machine, you can simply run devup, devbash and devdown.
Additional Commands
Opening bash on the workspace container (to run artisan for example):
./sync.sh bash
Manually triggering the synchronization of the files:
./sync.sh sync
Removing and cleaning up the files and the docker-sync container. Use only if you want to rebuild or remove docker-sync completely. The files on the host will be kept untouched.
./sync.sh clean
Additional Notes
- You may run laradock with or without docker-sync at any time using with the same
.env and docker-compose.yml, because the configuration is overridden automatically when docker-sync is used.
- You may inspect the
sync.sh script to learn each of the commands and even add custom ones.
- If a container cannot access the files on docker-sync, you may need to set a user on the Dockerfile of that container with an id of 1000 (this is the UID that nginx and php-fpm have configured on laradock). Alternatively, you may change the permissions to 777, but this is not recommended.
Visit the docker-sync documentation for more details.
D4m-nfs automatically mount NFS volume instead of osxfs one.
1) Update the Docker [File Sharing] preferences:
Click on the Docker Icon > Preferences > (remove everything form the list except /tmp).
2) Restart Docker.
3) Clone the d4m-nfs repository to your home directory.
git clone https://github.com/IFSight/d4m-nfs ~/d4m-nfs
4) Create (or edit) the file ~/d4m-nfs/etc/d4m-nfs-mounts.txt, and write the following configuration in it:
/Users:/Users
5) Create (or edit) the file /etc/exports, make sure it exists and is empty. (There may be collisions if you come from Vagrant or if you already executed the d4m-nfs.sh script before).
6) Run the d4m-nfs.sh script (might need Sudo):
~/d4m-nfs/d4m-nfs.sh
That’s it! Run your containers.. Example:
docker-compose up ...
Note: If you faced any errors, try restarting Docker, and make sure you have no spaces in the d4m-nfs-mounts.txt file, and your /etc/exports file is clear.
Common Problems
Here’s a list of the common problems you might face, and the possible solutions.
I see a blank (white) page instead of the Laravel ‘Welcome’ page!
Run the following command from the Laravel root directory:
sudo chmod -R 777 storage bootstrap/cache
I see “Welcome to nginx” instead of the Laravel App!
Use http://127.0.0.1 instead of http://localhost in your browser.
I see an error message containing address already in use or port is already allocated
Make sure the ports for the services that you are trying to run (22, 80, 443, 3306, etc.) are not being used already by other programs on the host, such as a built in apache/httpd service or other development tools you have installed.
I get NGINX error 404 Not Found on Windows.
- Go to docker Settings on your Windows machine.
- Click on the
Shared Drives tab and check the drive that contains your project files.
- Enter your windows username and password.
- Go to the
reset tab and click restart docker.
The time in my services does not match the current time
- Make sure you’ve changed the timezone.
- Stop and rebuild the containers (
docker-compose up -d --build <services>)
I get MySQL connection refused
This error sometimes happens because your Laravel application isn’t running on the container localhost IP (Which is 127.0.0.1). Steps to fix it:
- Option A
- Check your running Laravel application IP by dumping
Request::ip() variable using dd(Request::ip()) anywhere on your application. The result is the IP of your Laravel container.
- Change the
DB_HOST variable on env with the IP that you received from previous step.
- Option B
- Change the
DB_HOST value to the same name as the MySQL docker container. The Laradock docker-compose file currently has this as mysql
I get stuck when building nginx on fetch http://mirrors.aliyun.com/alpine/v3.5/main/x86_64/APKINDEX.tar.gz
As stated on #749, Already fixed,just set CHANGE_SOURCE to false.
Custom composer repo packagist url and npm registry url
In China, the origin source of composer and npm is very slow. You can add WORKSPACE_NPM_REGISTRY and WORKSPACE_COMPOSER_REPO_PACKAGIST config in .env to use your custom source.
Example:
WORKSPACE_NPM_REGISTRY=https://registry.npm.taobao.org
WORKSPACE_COMPOSER_REPO_PACKAGIST=https://packagist.phpcomposer.com
I get Module build failed: Error: write EPIPE while compiling react application
When you run npm build or yarn dev building a react application using webpack with elixir you may receive a Error: write EPIPE while processing .jpg images.
This is caused of an outdated library for processing .jpg files in ubuntu 16.04.
To fix the problem you can follow those steps
1 - Open the .env.
2 - Search for WORKSPACE_INSTALL_LIBPNG or add the key if missing.
3 - Set the value to true:
WORKSPACE_INSTALL_LIBPNG=true
4 - Finally rebuild the workspace image
docker-compose build workspace


